Installing on an ultrasound device? Find guides, troubleshooting and more!
Overview
Installation Guides
Troubleshooting
Technical Support
Welcome to Ultrasound AI Customer Resources. Use these guides to connect to your ultrasound machine, send studies securely, and verify they appear in your Ultrasound AI portal.
What you'll need:
Access to your Ultrasound AI portal, you should have received an email with access instructions.
A USB drive to transfer certificate files to your machine.
Your machine's AE Title
Universal Setup
Generate & Download Certificates
Log into the Ultrasound AI portal.
Click Admin → Certificates.
In Registered Devices, review and manage existing devices.
Click Generate & Download to download the certificate bundle for this device.
If you are configuring multiple devices, click Generate to create certificates without downloading,
then use Download All located above to download all certificate bundles at once.
Certificate Bundle Guide
After you download and unzip your certificate bundle, you’ll see several files.
Different ultrasound machines require different certificate formats — this bundle includes multiple options so you can choose the one your device needs.
certificate.crt / certificate_bundle.pem / key files — separate certificate files (for systems that require them)
README.txt / certificate_info.json — reference and support files
legacy_keys directory — compatibility files for older machines
Next: Copy the extracted files to a USB drive and bring it to your ultrasound machine.
Device Installation Guides
Installation steps may vary slightly by manufacturer and machine software version. The Quick Install steps below outline the general process that applies to most cart-based ultrasound systems. For guidance on specific device screens or menu names, refer to the manufacturer-specific instructions.
Quick Install
Use these instructions if you are familiar with your device or need a high-level guide.
On the ultrasound machine, navigate to Connectivity or DICOM Settings.
Add a new DICOM Server (may be labeled Add, New, or Create).
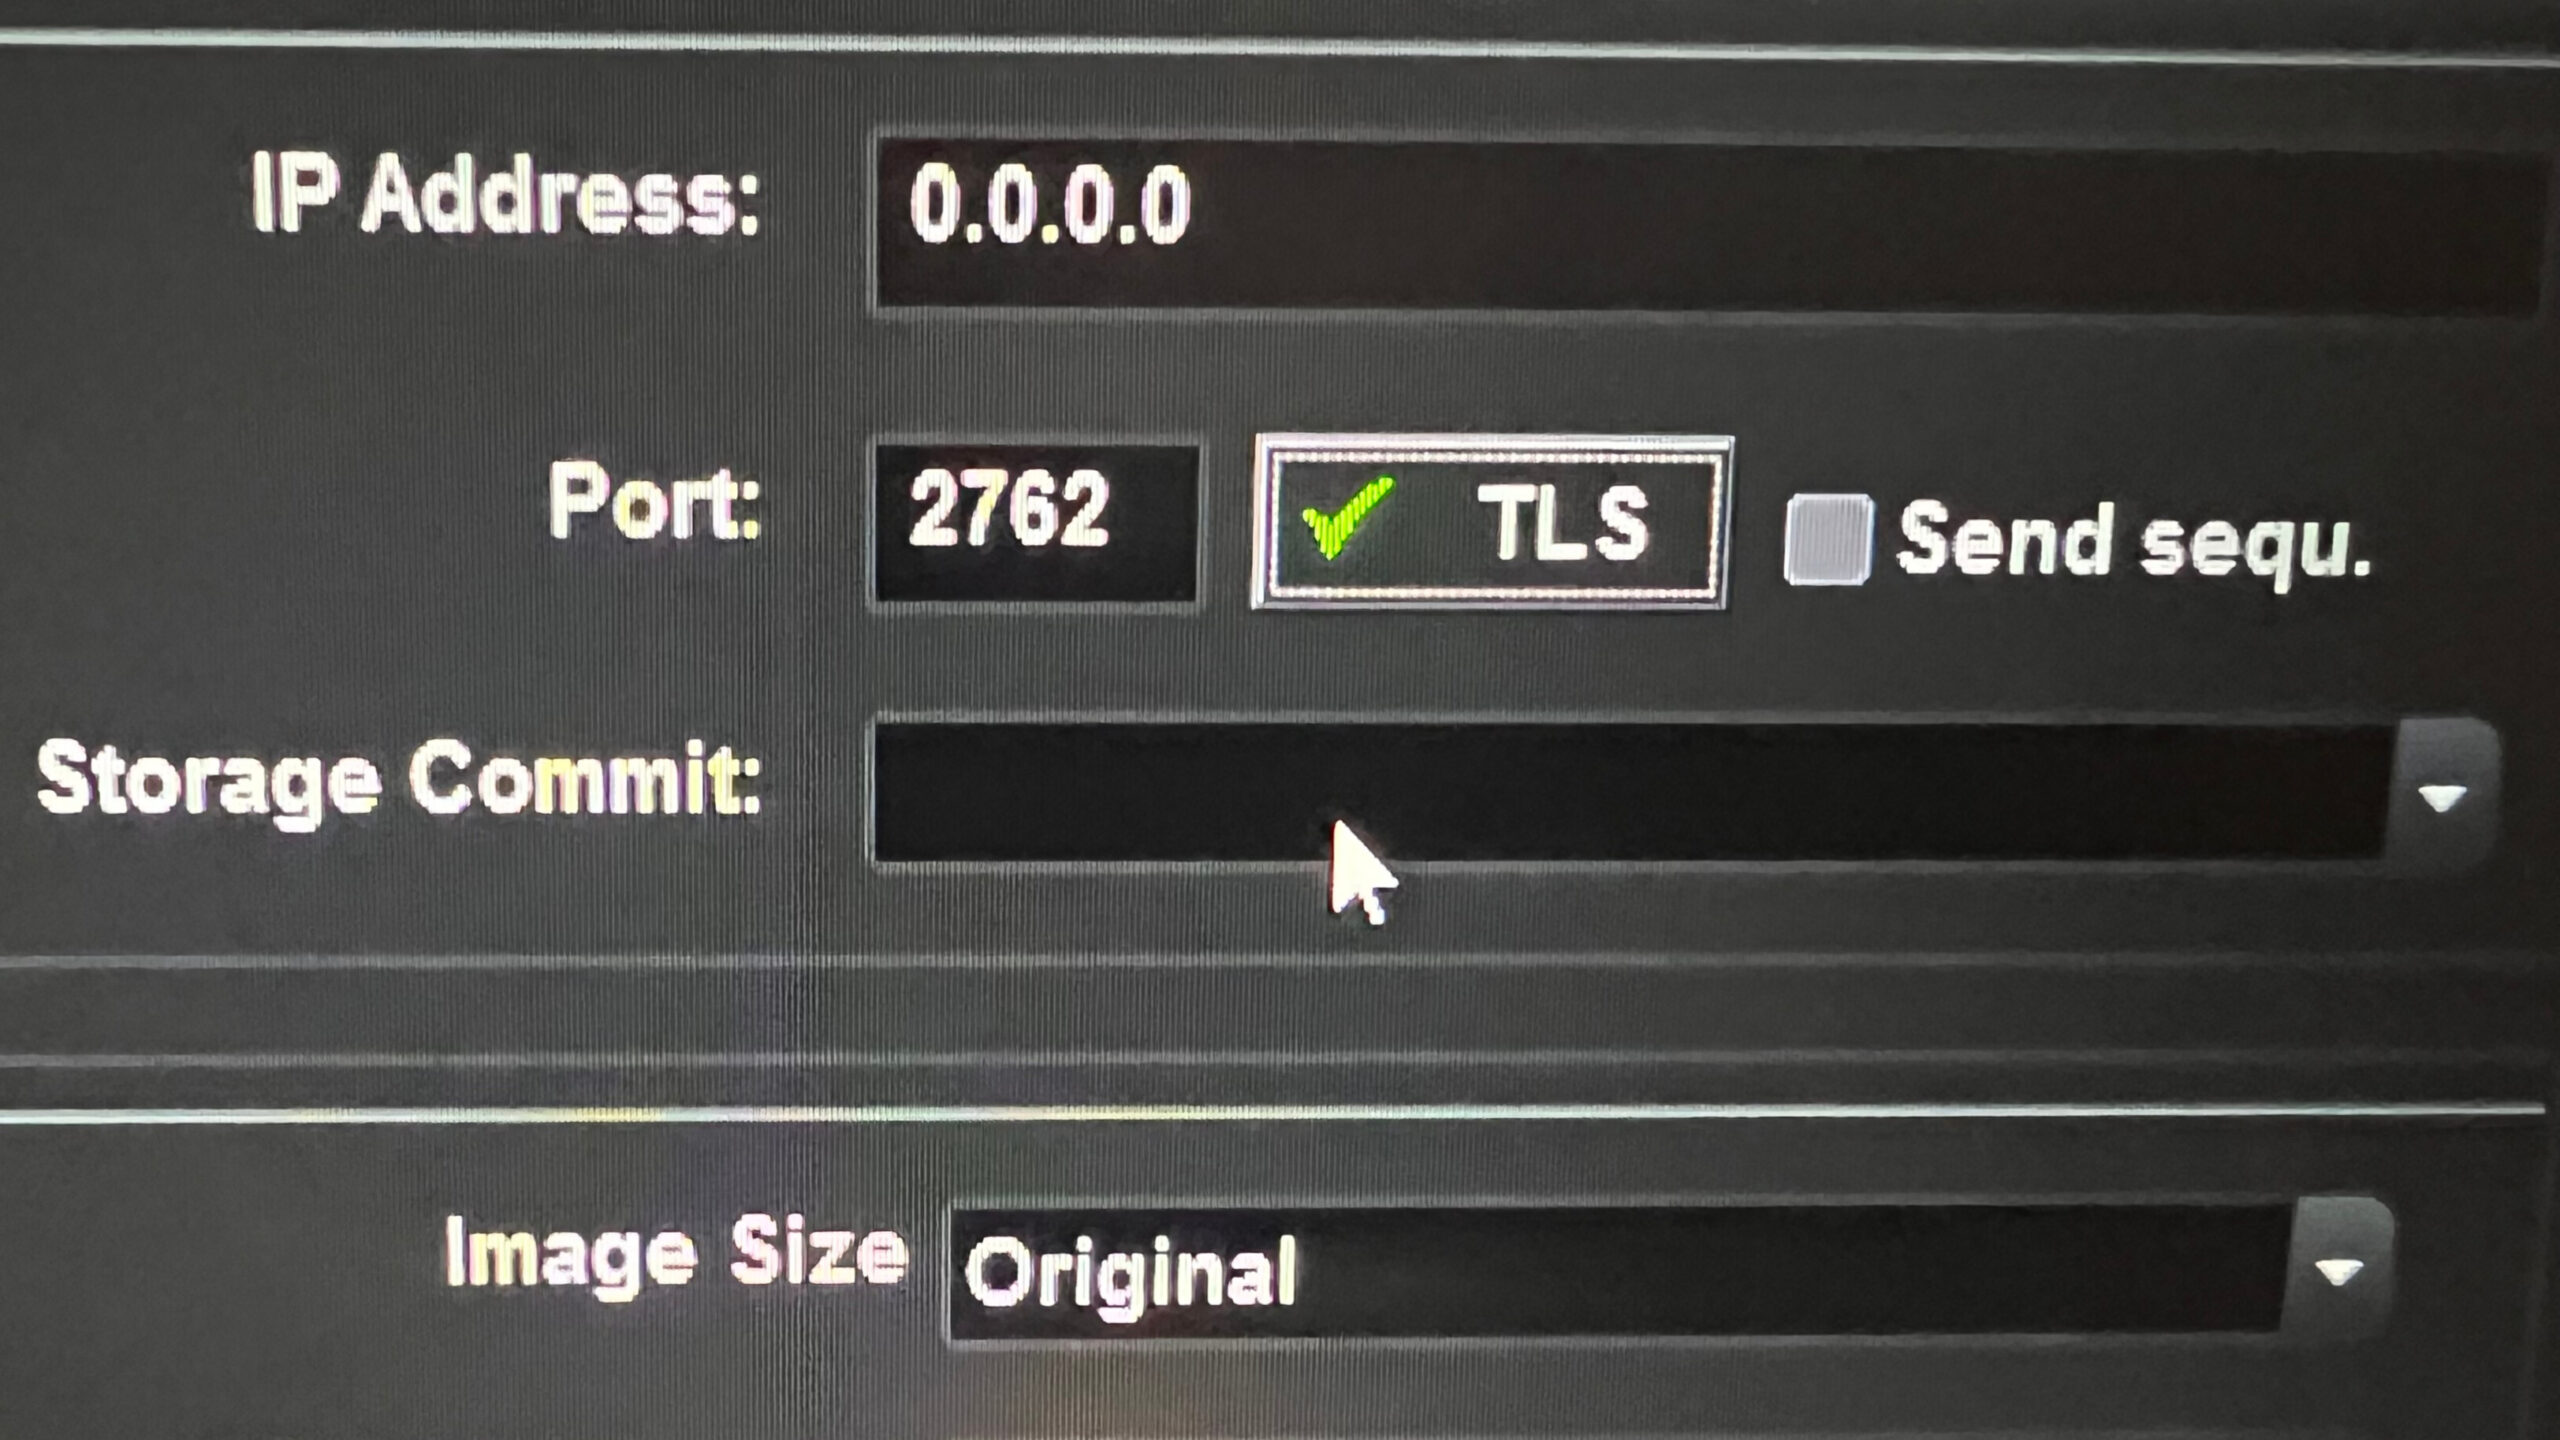
Enter the following values provided in the portal or README.txt:
IP Address or Hostname
Your device’s AE Title
Port Number
Alias (e.g., Ultrasound AI)
Enable all TLS or Secure Connection settings.
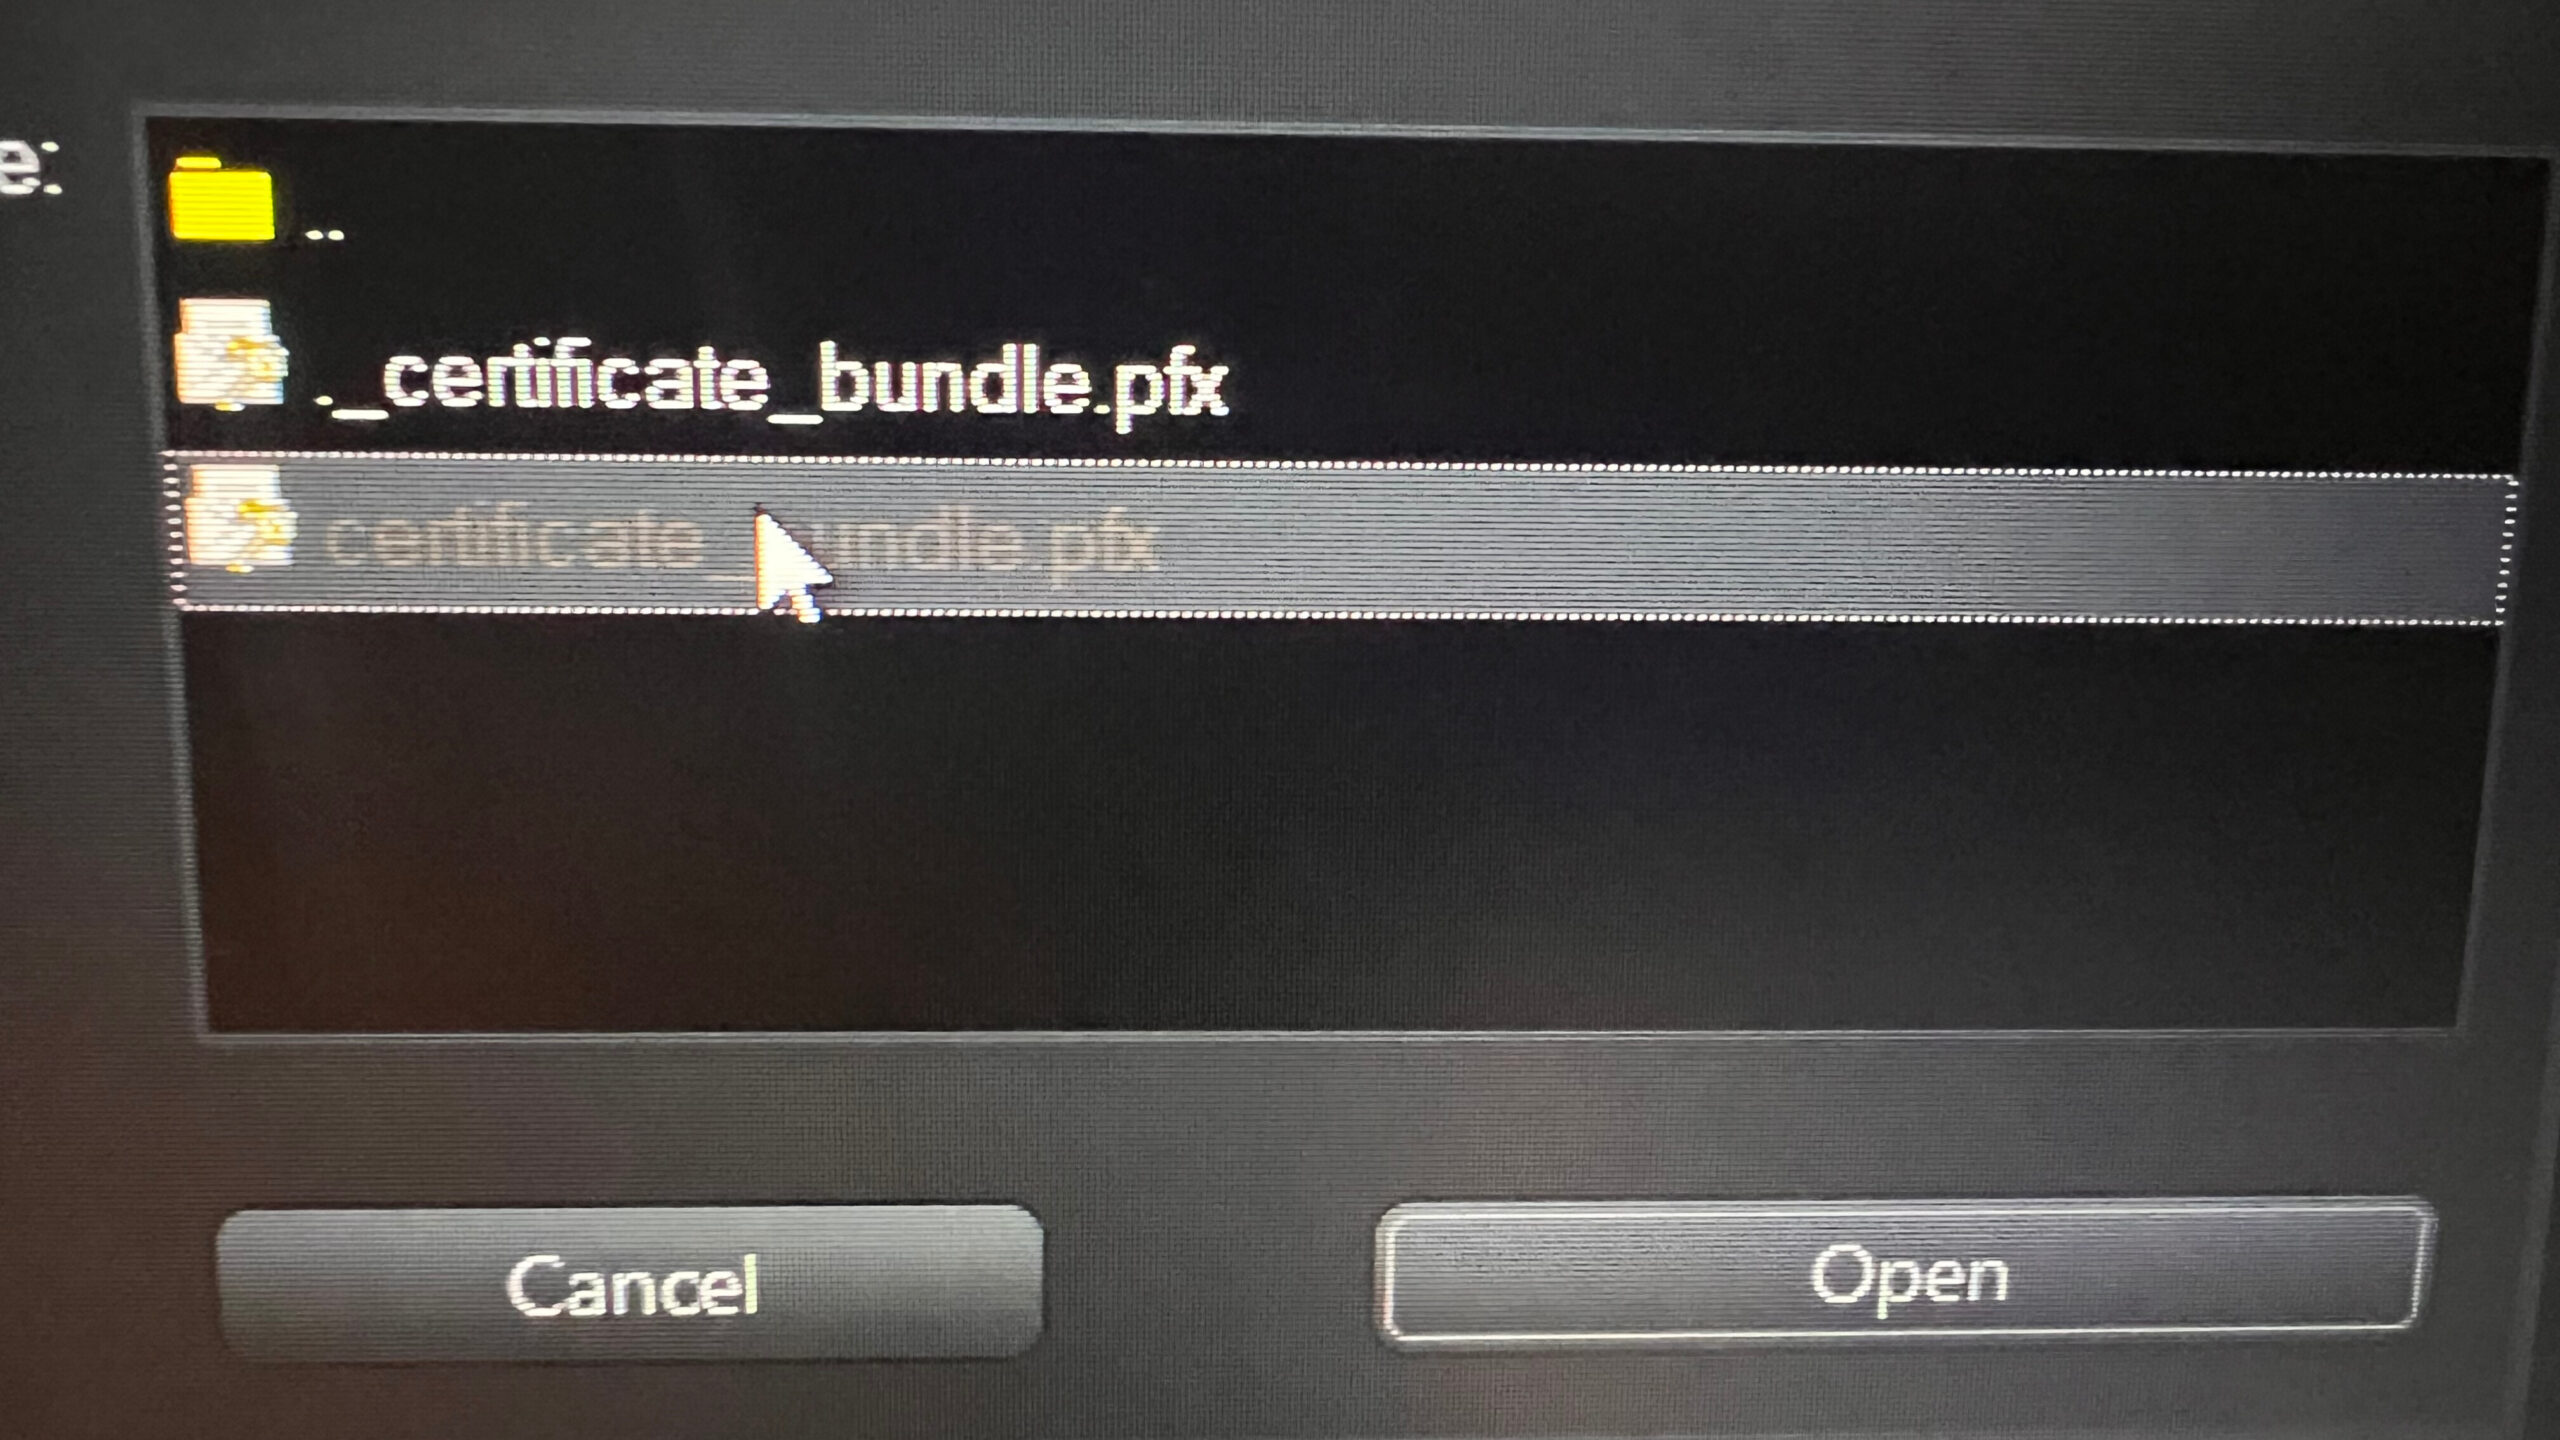
Import the certificate file compatible with your device, typically the .pfx file.
Select the file from the top level of the certificate folder on the USB.
If the first file experiences issues, try the files in the legacy folder.
Enter the password: 123456 if prompted.
Save the configuration.
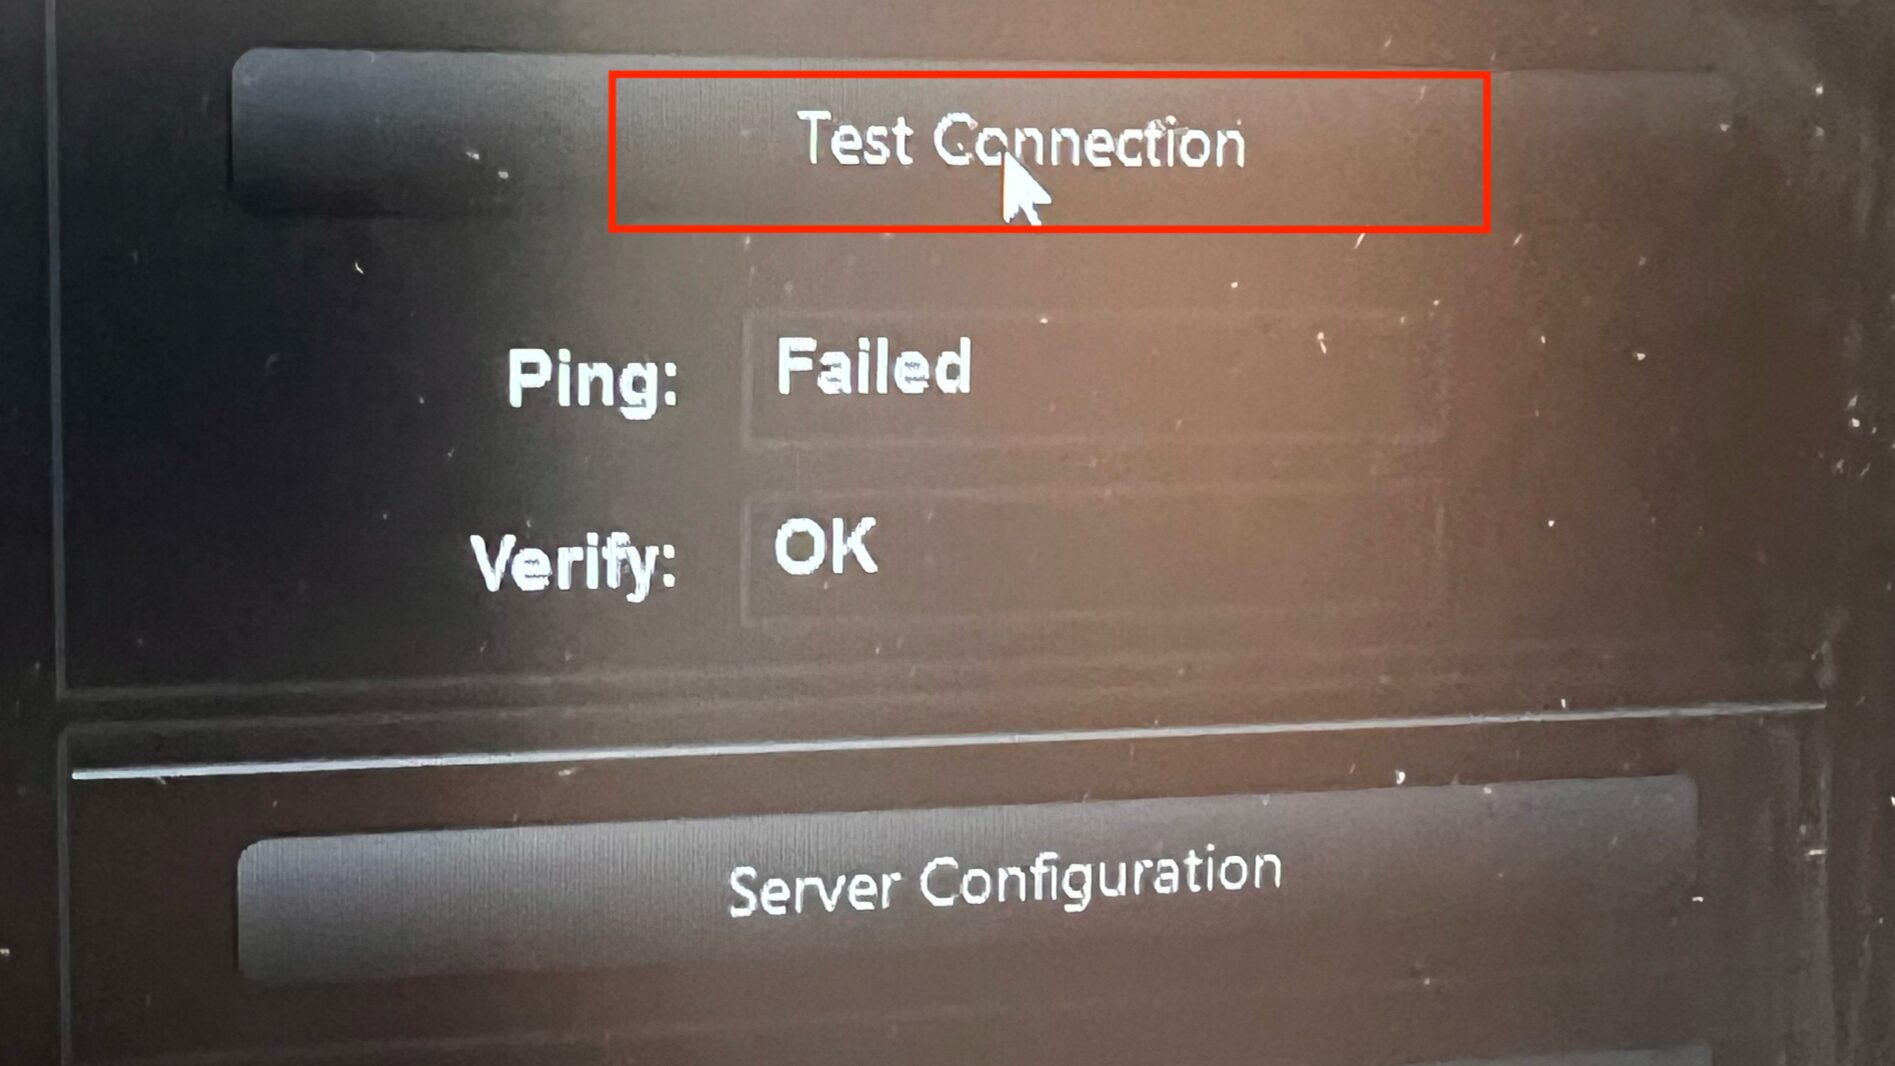
Test or Verify the connection.
Expected result: Verification successful
(Ping failures may occur on some systems and are normal)
If additional options, warnings, or errors appear, refer to the Troubleshooting tab.
LOGIQ and Voluson
Where to find DICOM settings System Setup → Connectivity → Device Setup → DICOM Configuration TLS Settings Accessed through a pop-up labeled TLS or Configure Server, depending on the system. Enable “Use TLS encrypted connection,” “Send Certificate to Server,” and “Verify Server Certificate” if available On newer machines, a green checkmark next to TLS indicates the certificates were imported successfully.
Connection Testing After saving, select the DICOM destination and choose Test Connection. A result of “Verify: OK” indicates a successful setup. Ping failures may occur and do not indicate an issue.
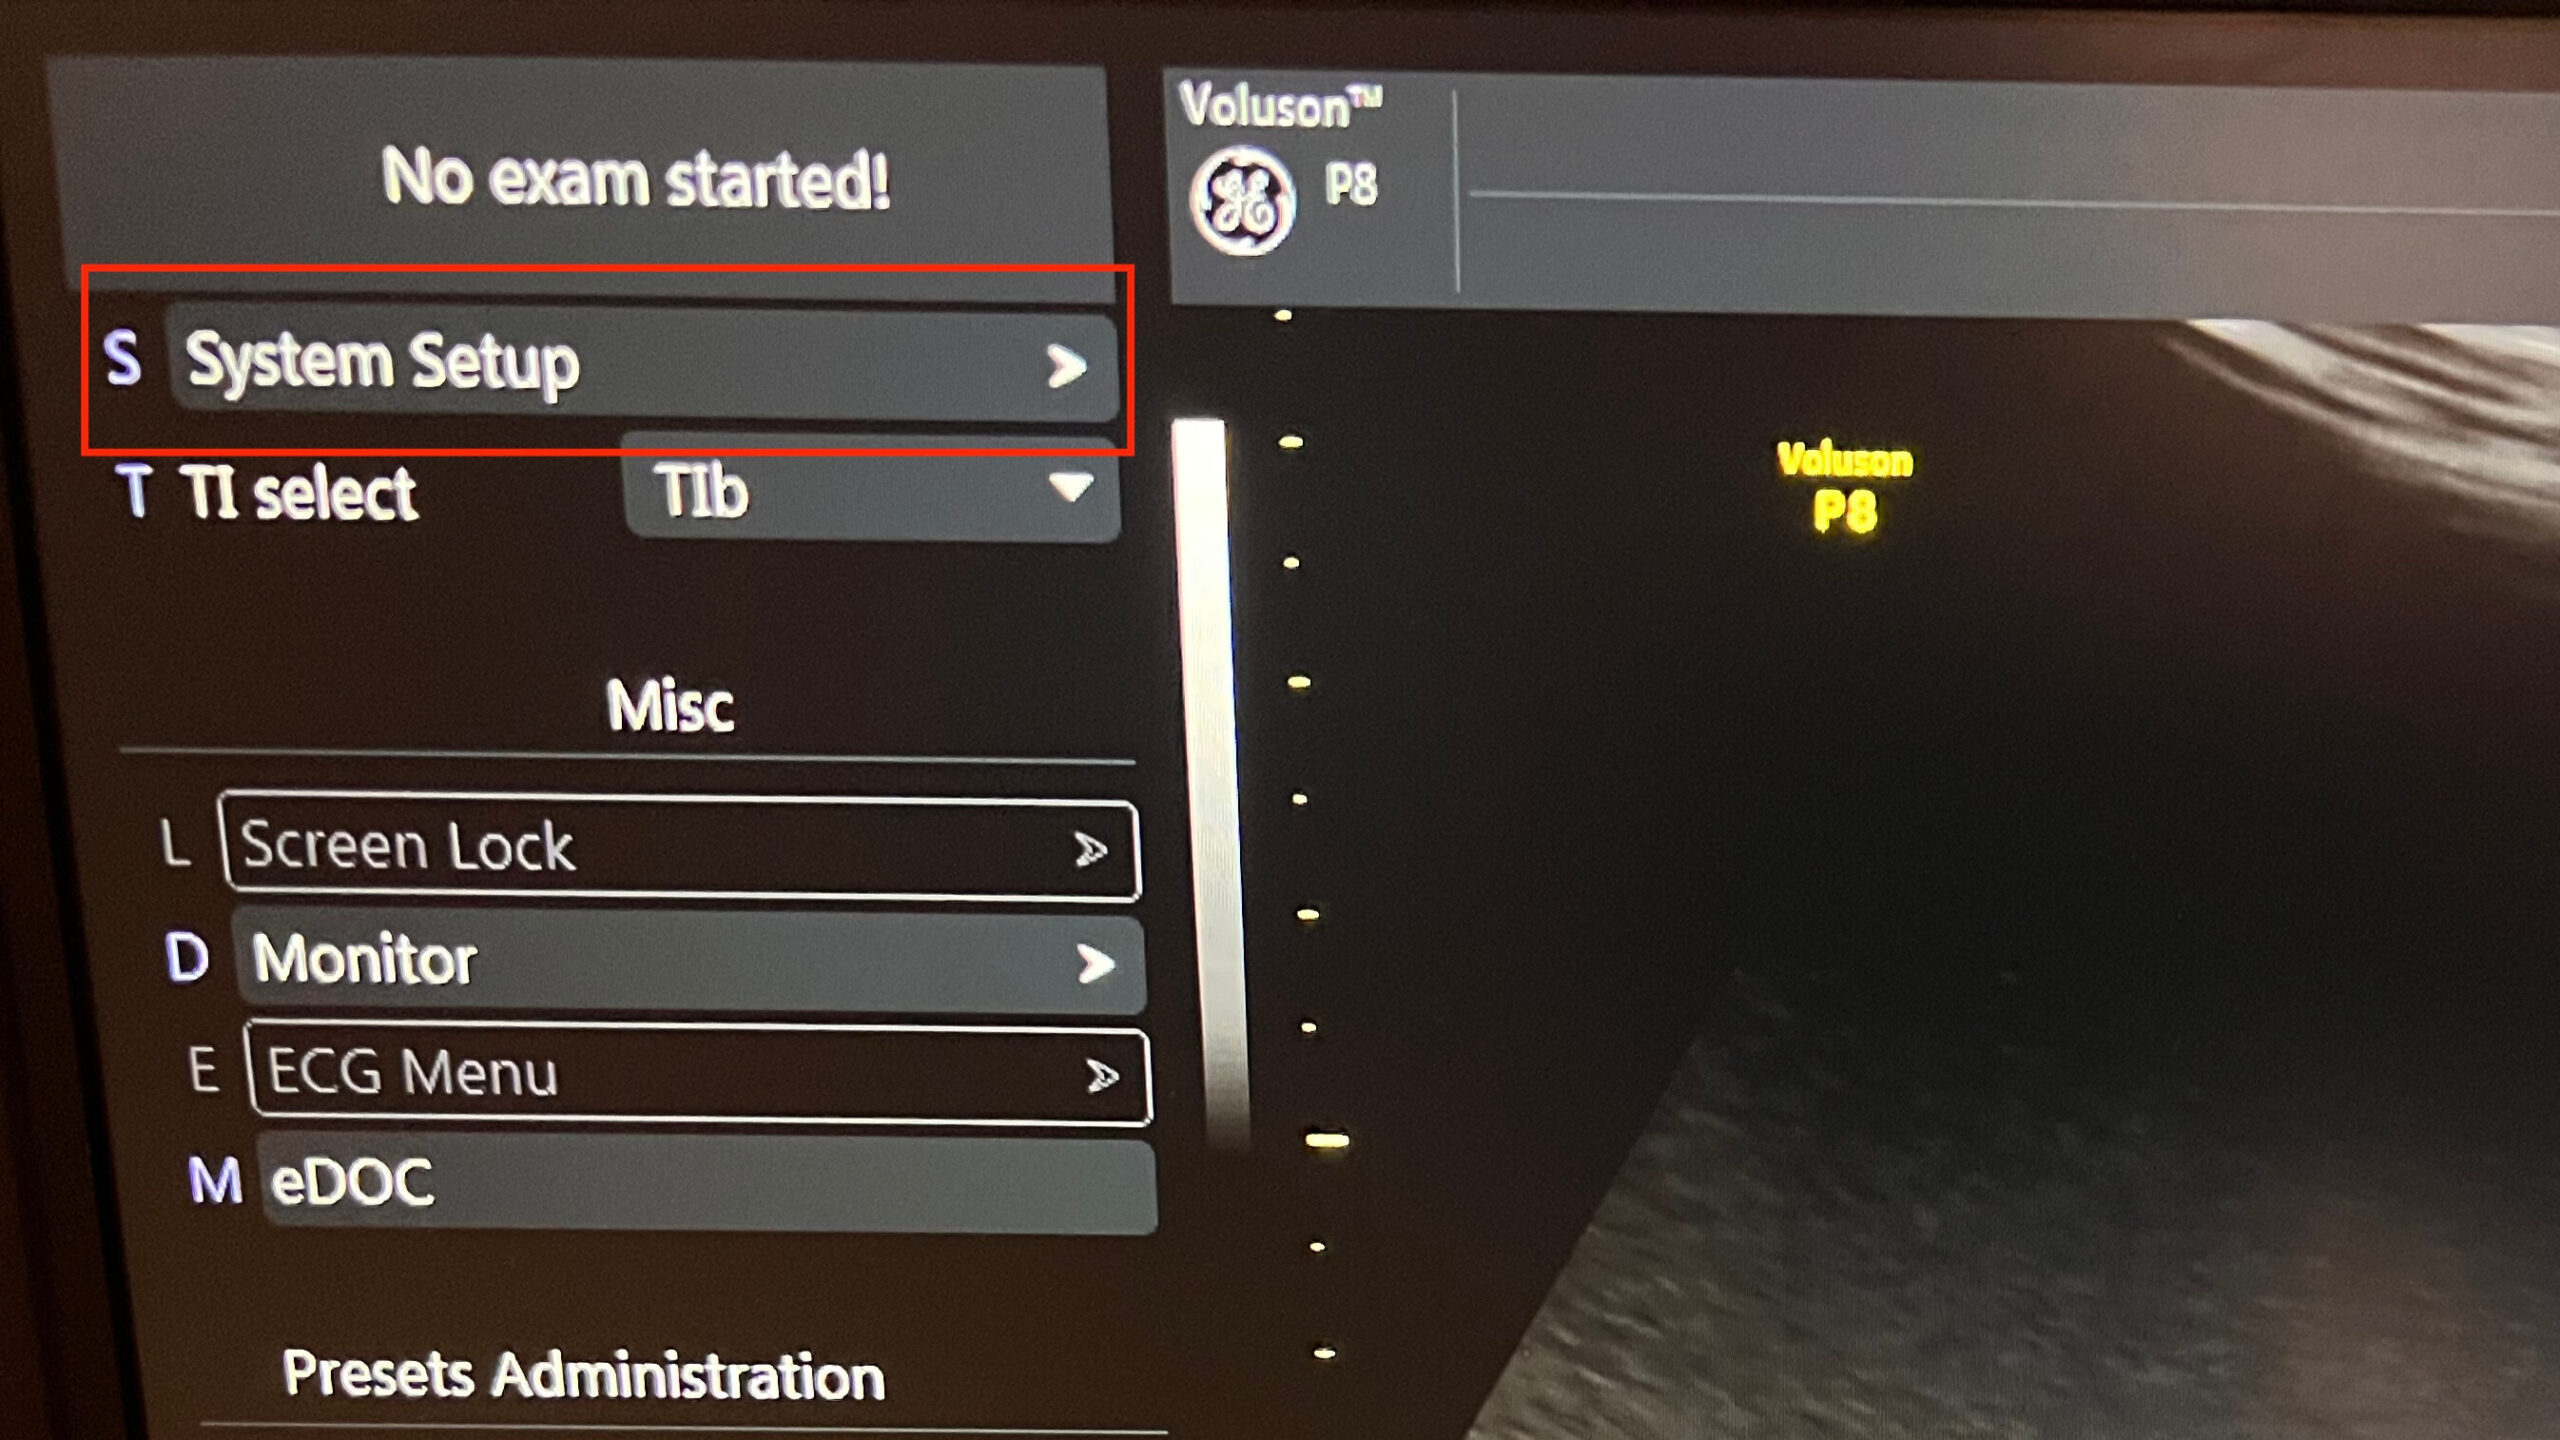
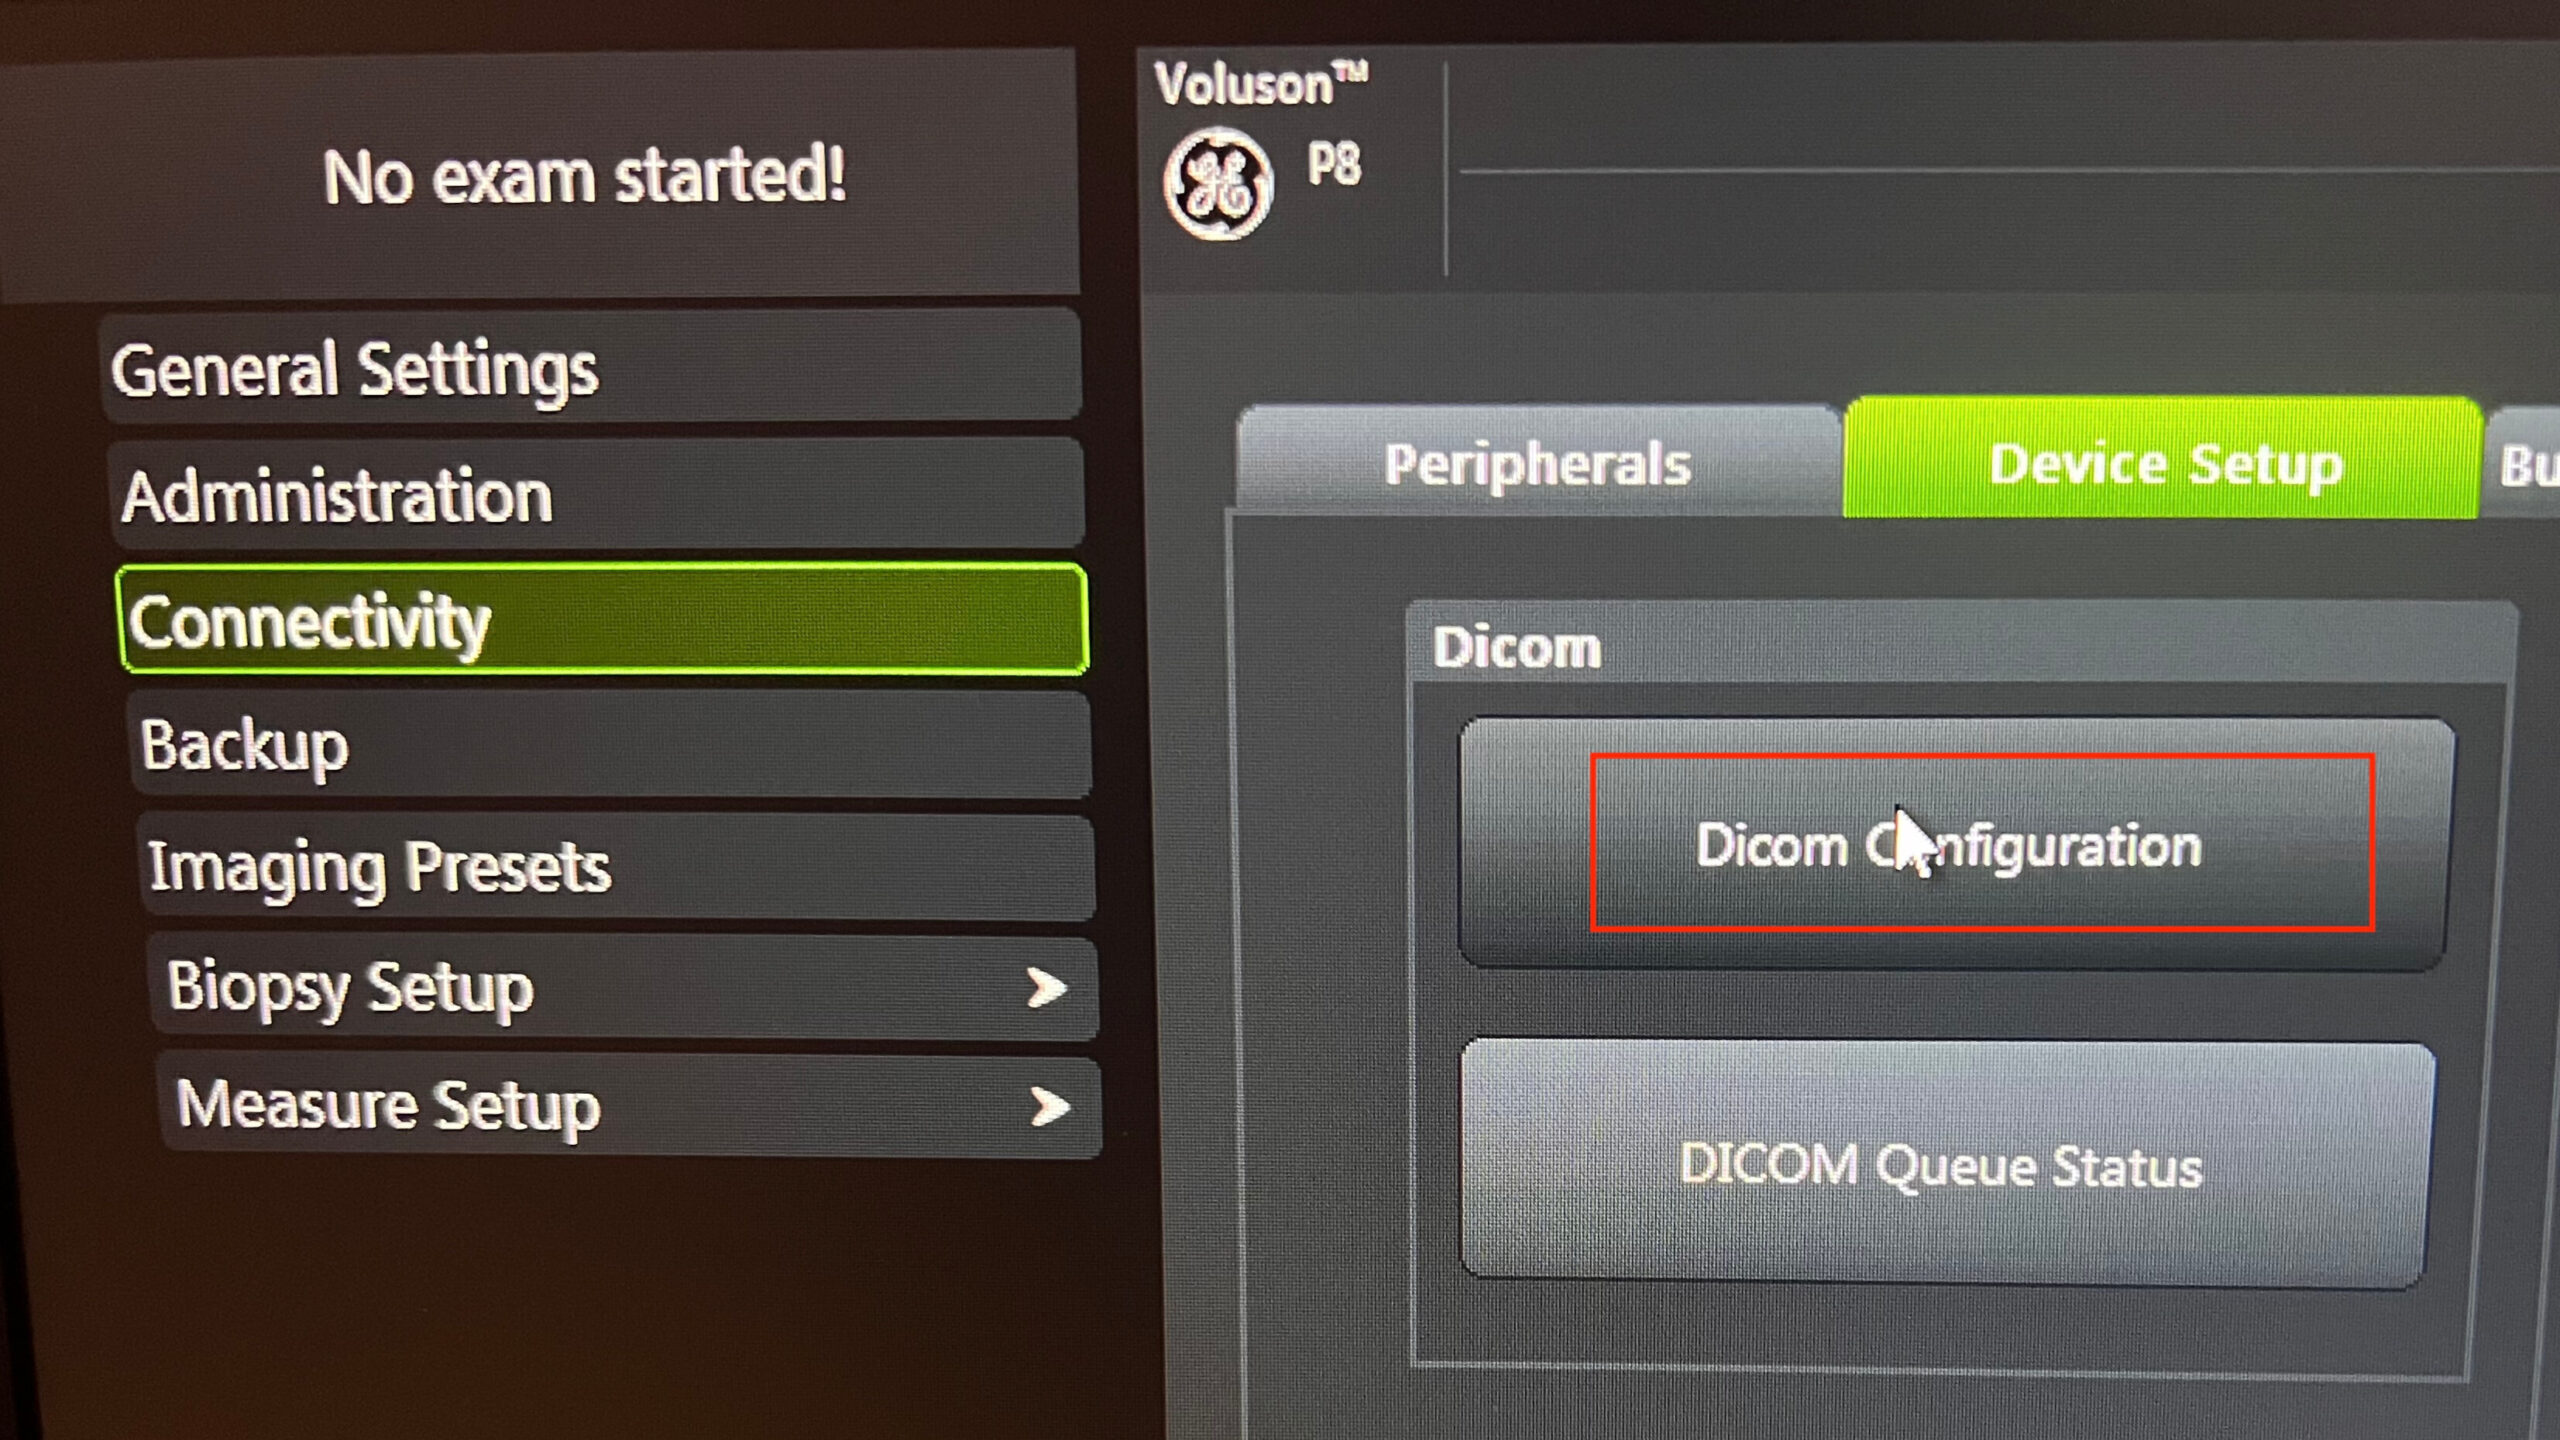
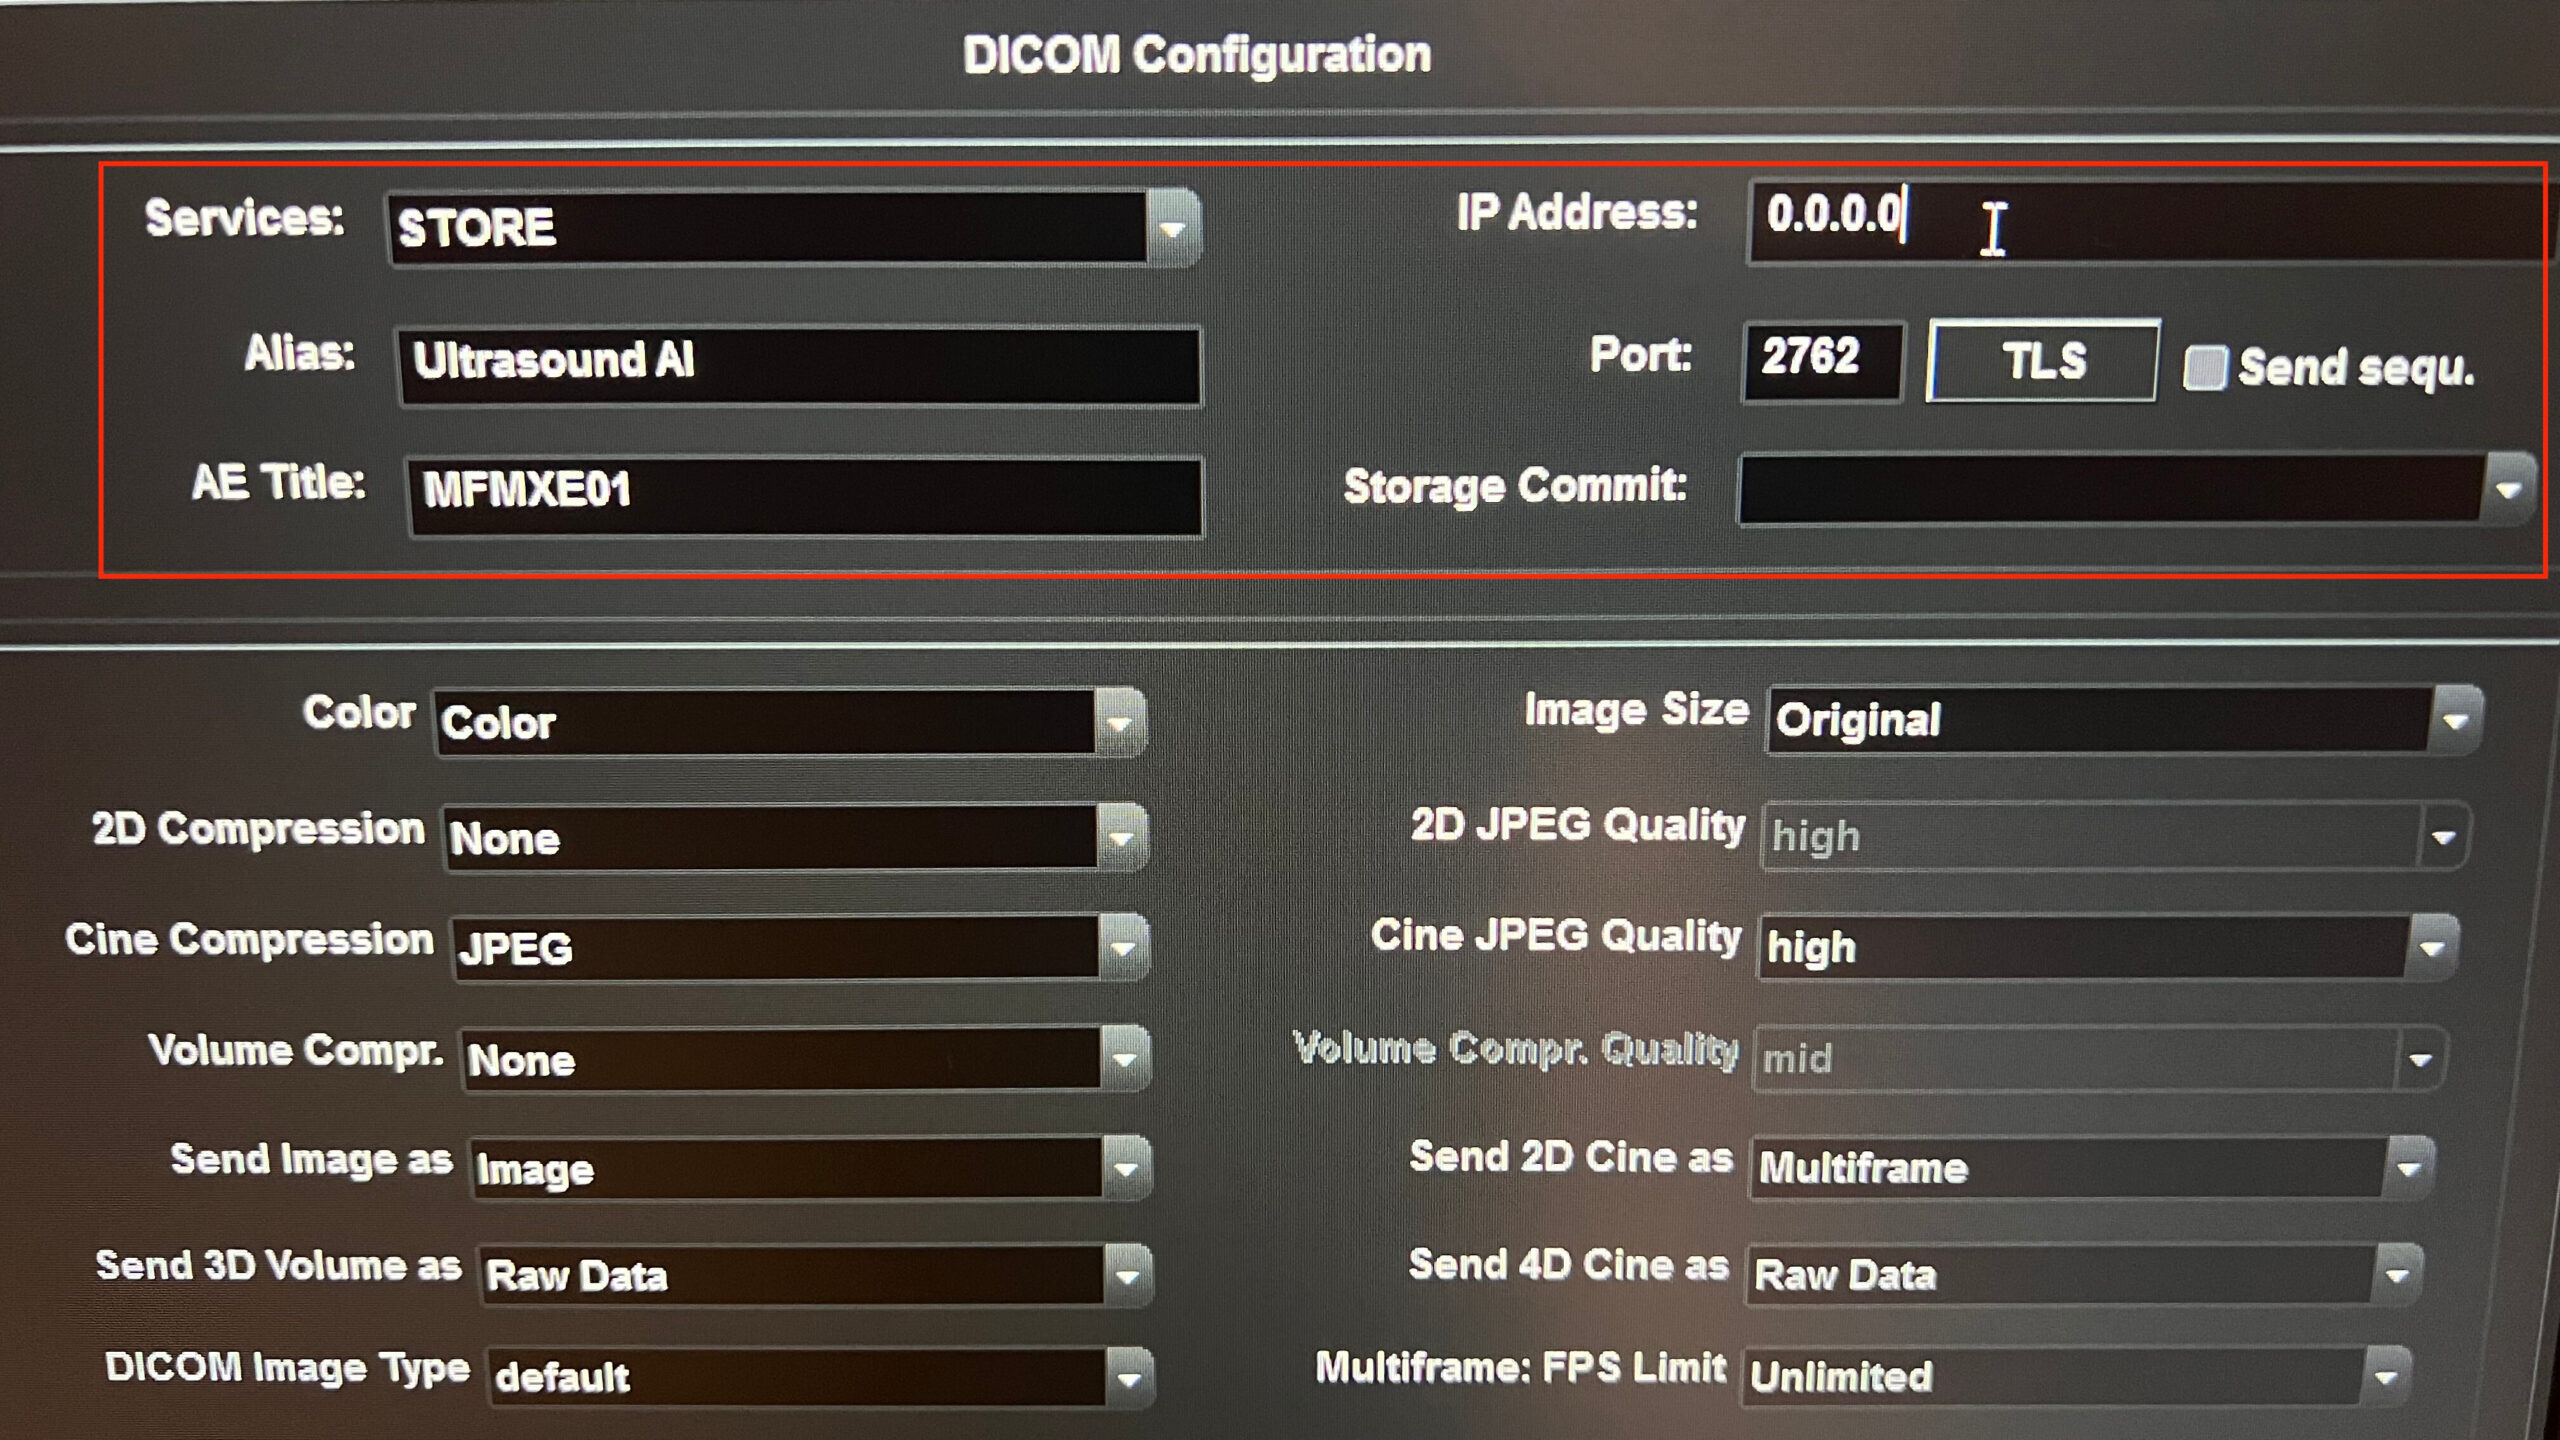
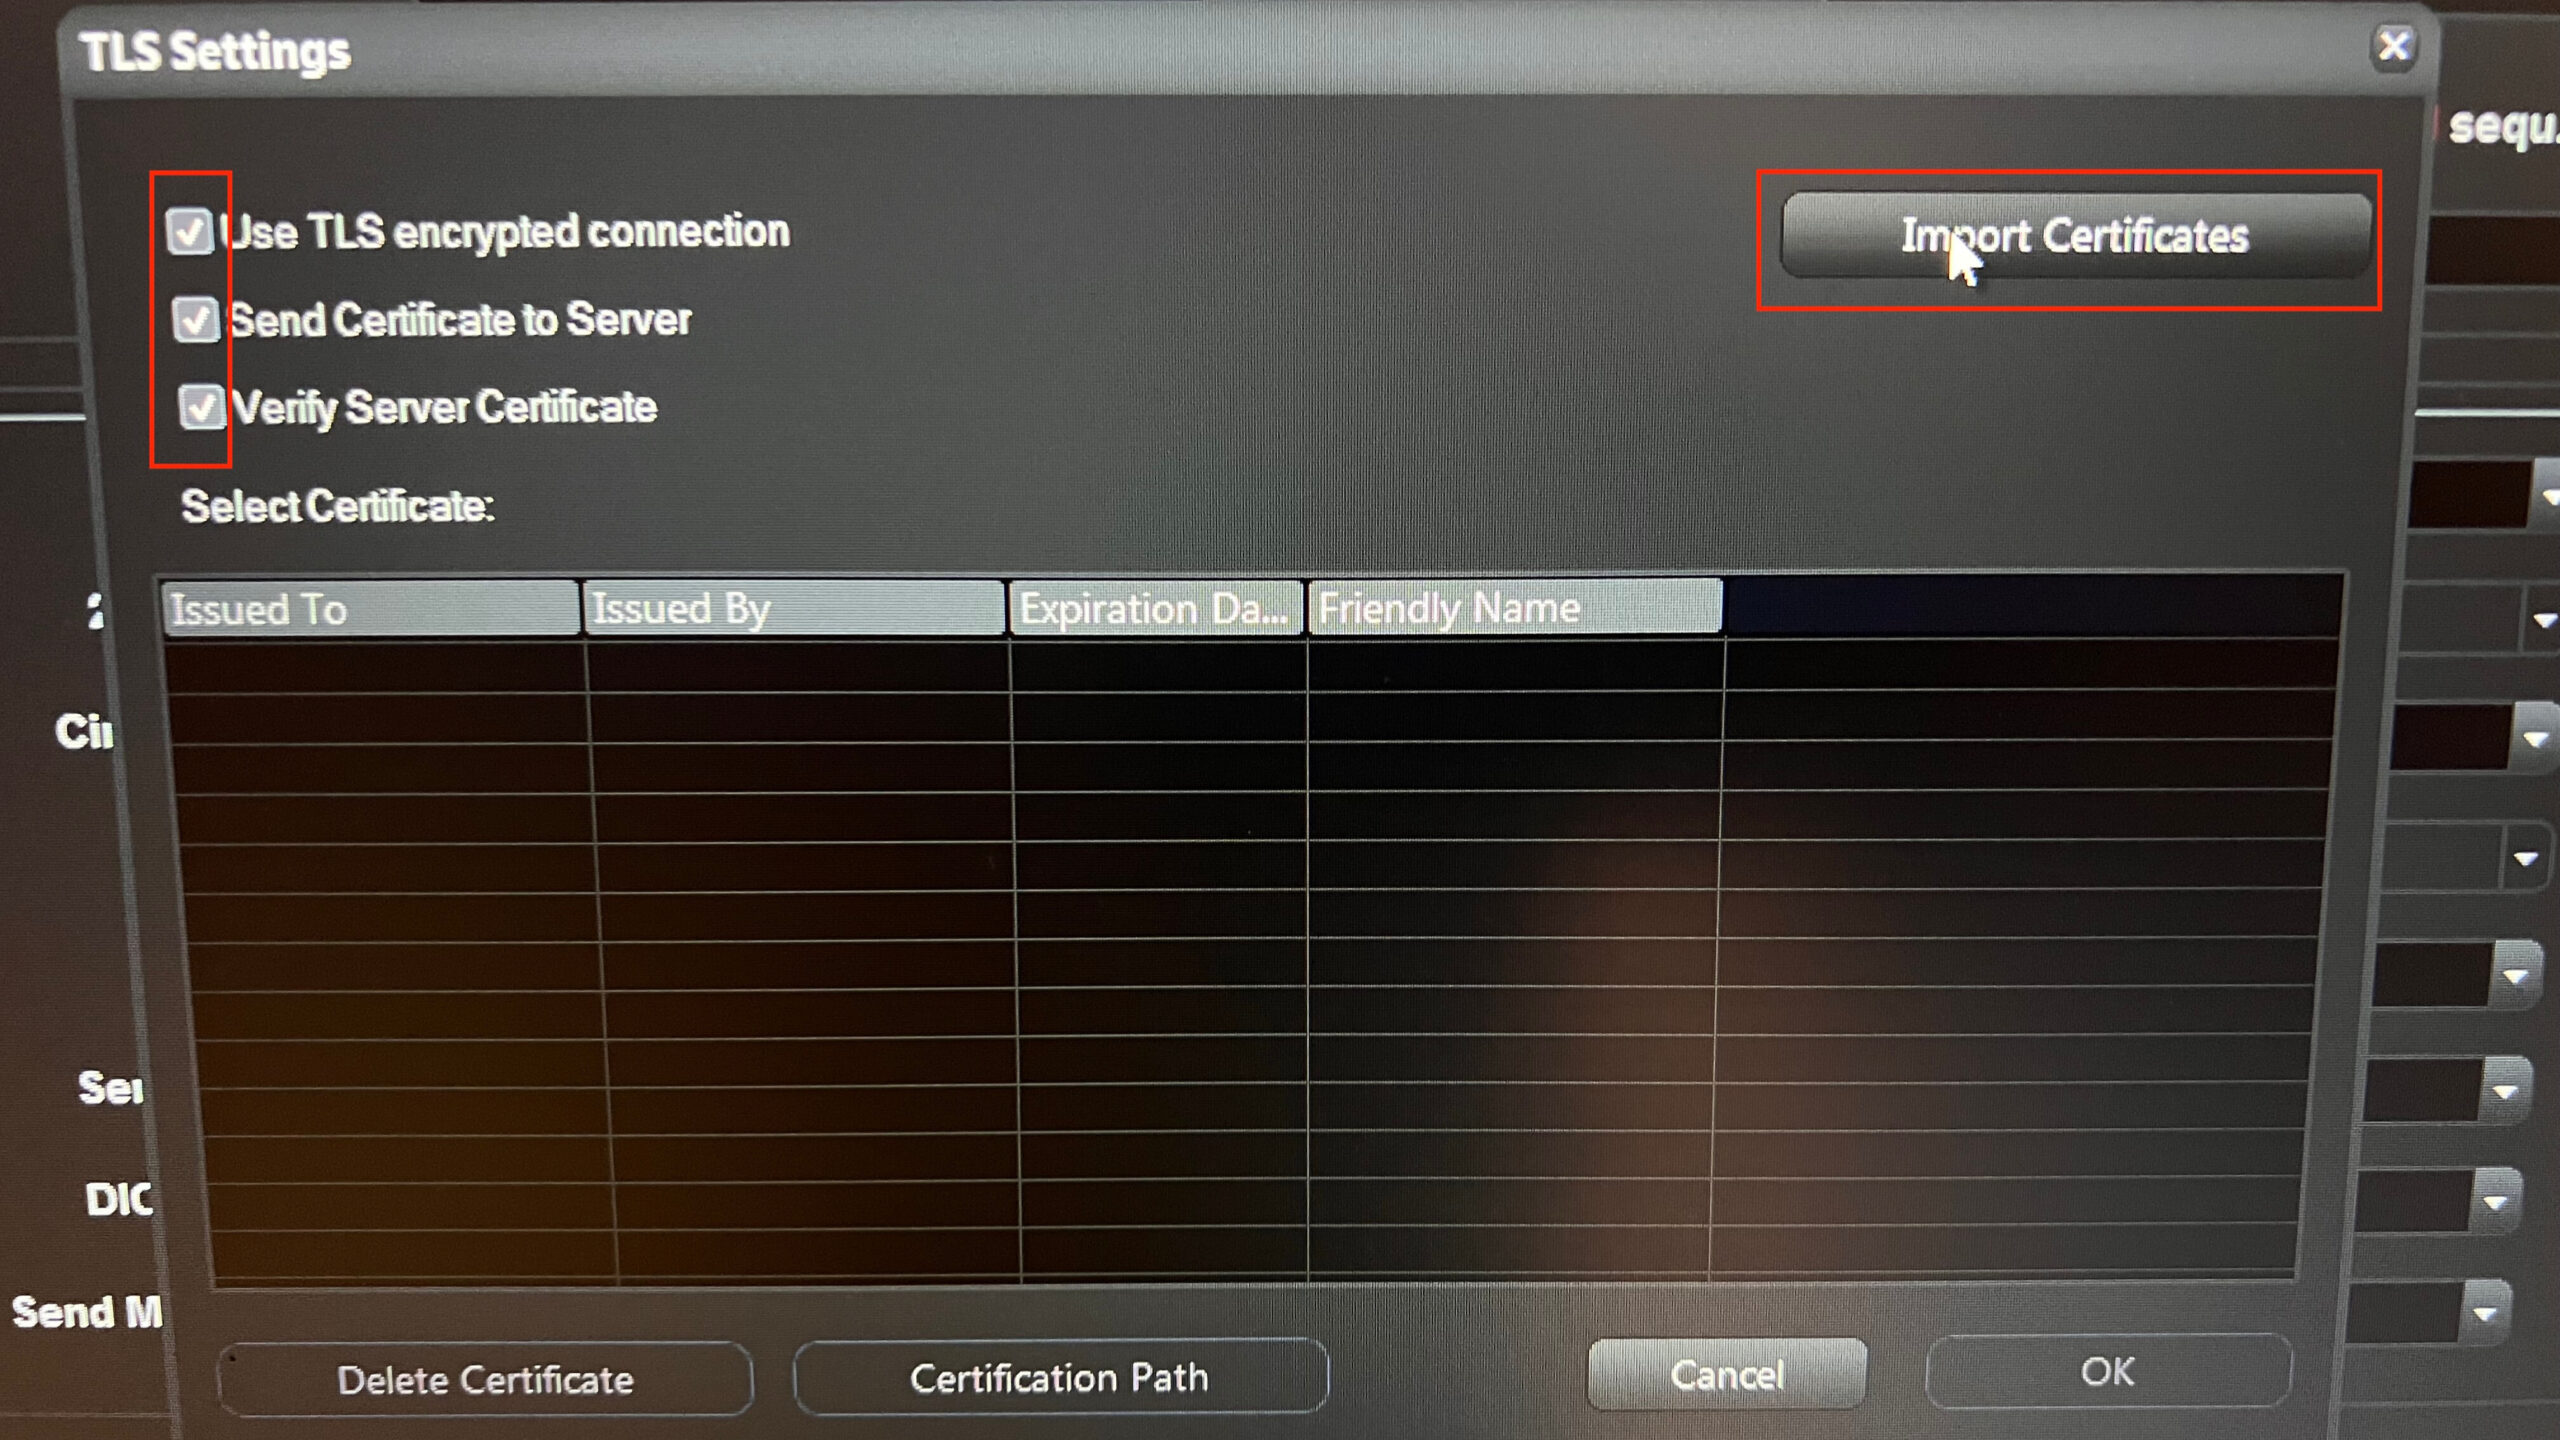
Show Images and Instructions for Older GE Machines
These screenshots show certificate and TLS setup on older GE Voluson systems. Menu names and layouts may vary slightly by software version.
Open System Setup from the main menu
Navigate to Connectivity → Device Setup → DICOM Configuration
Enter device's AE Title, IP Address, Alias and Port
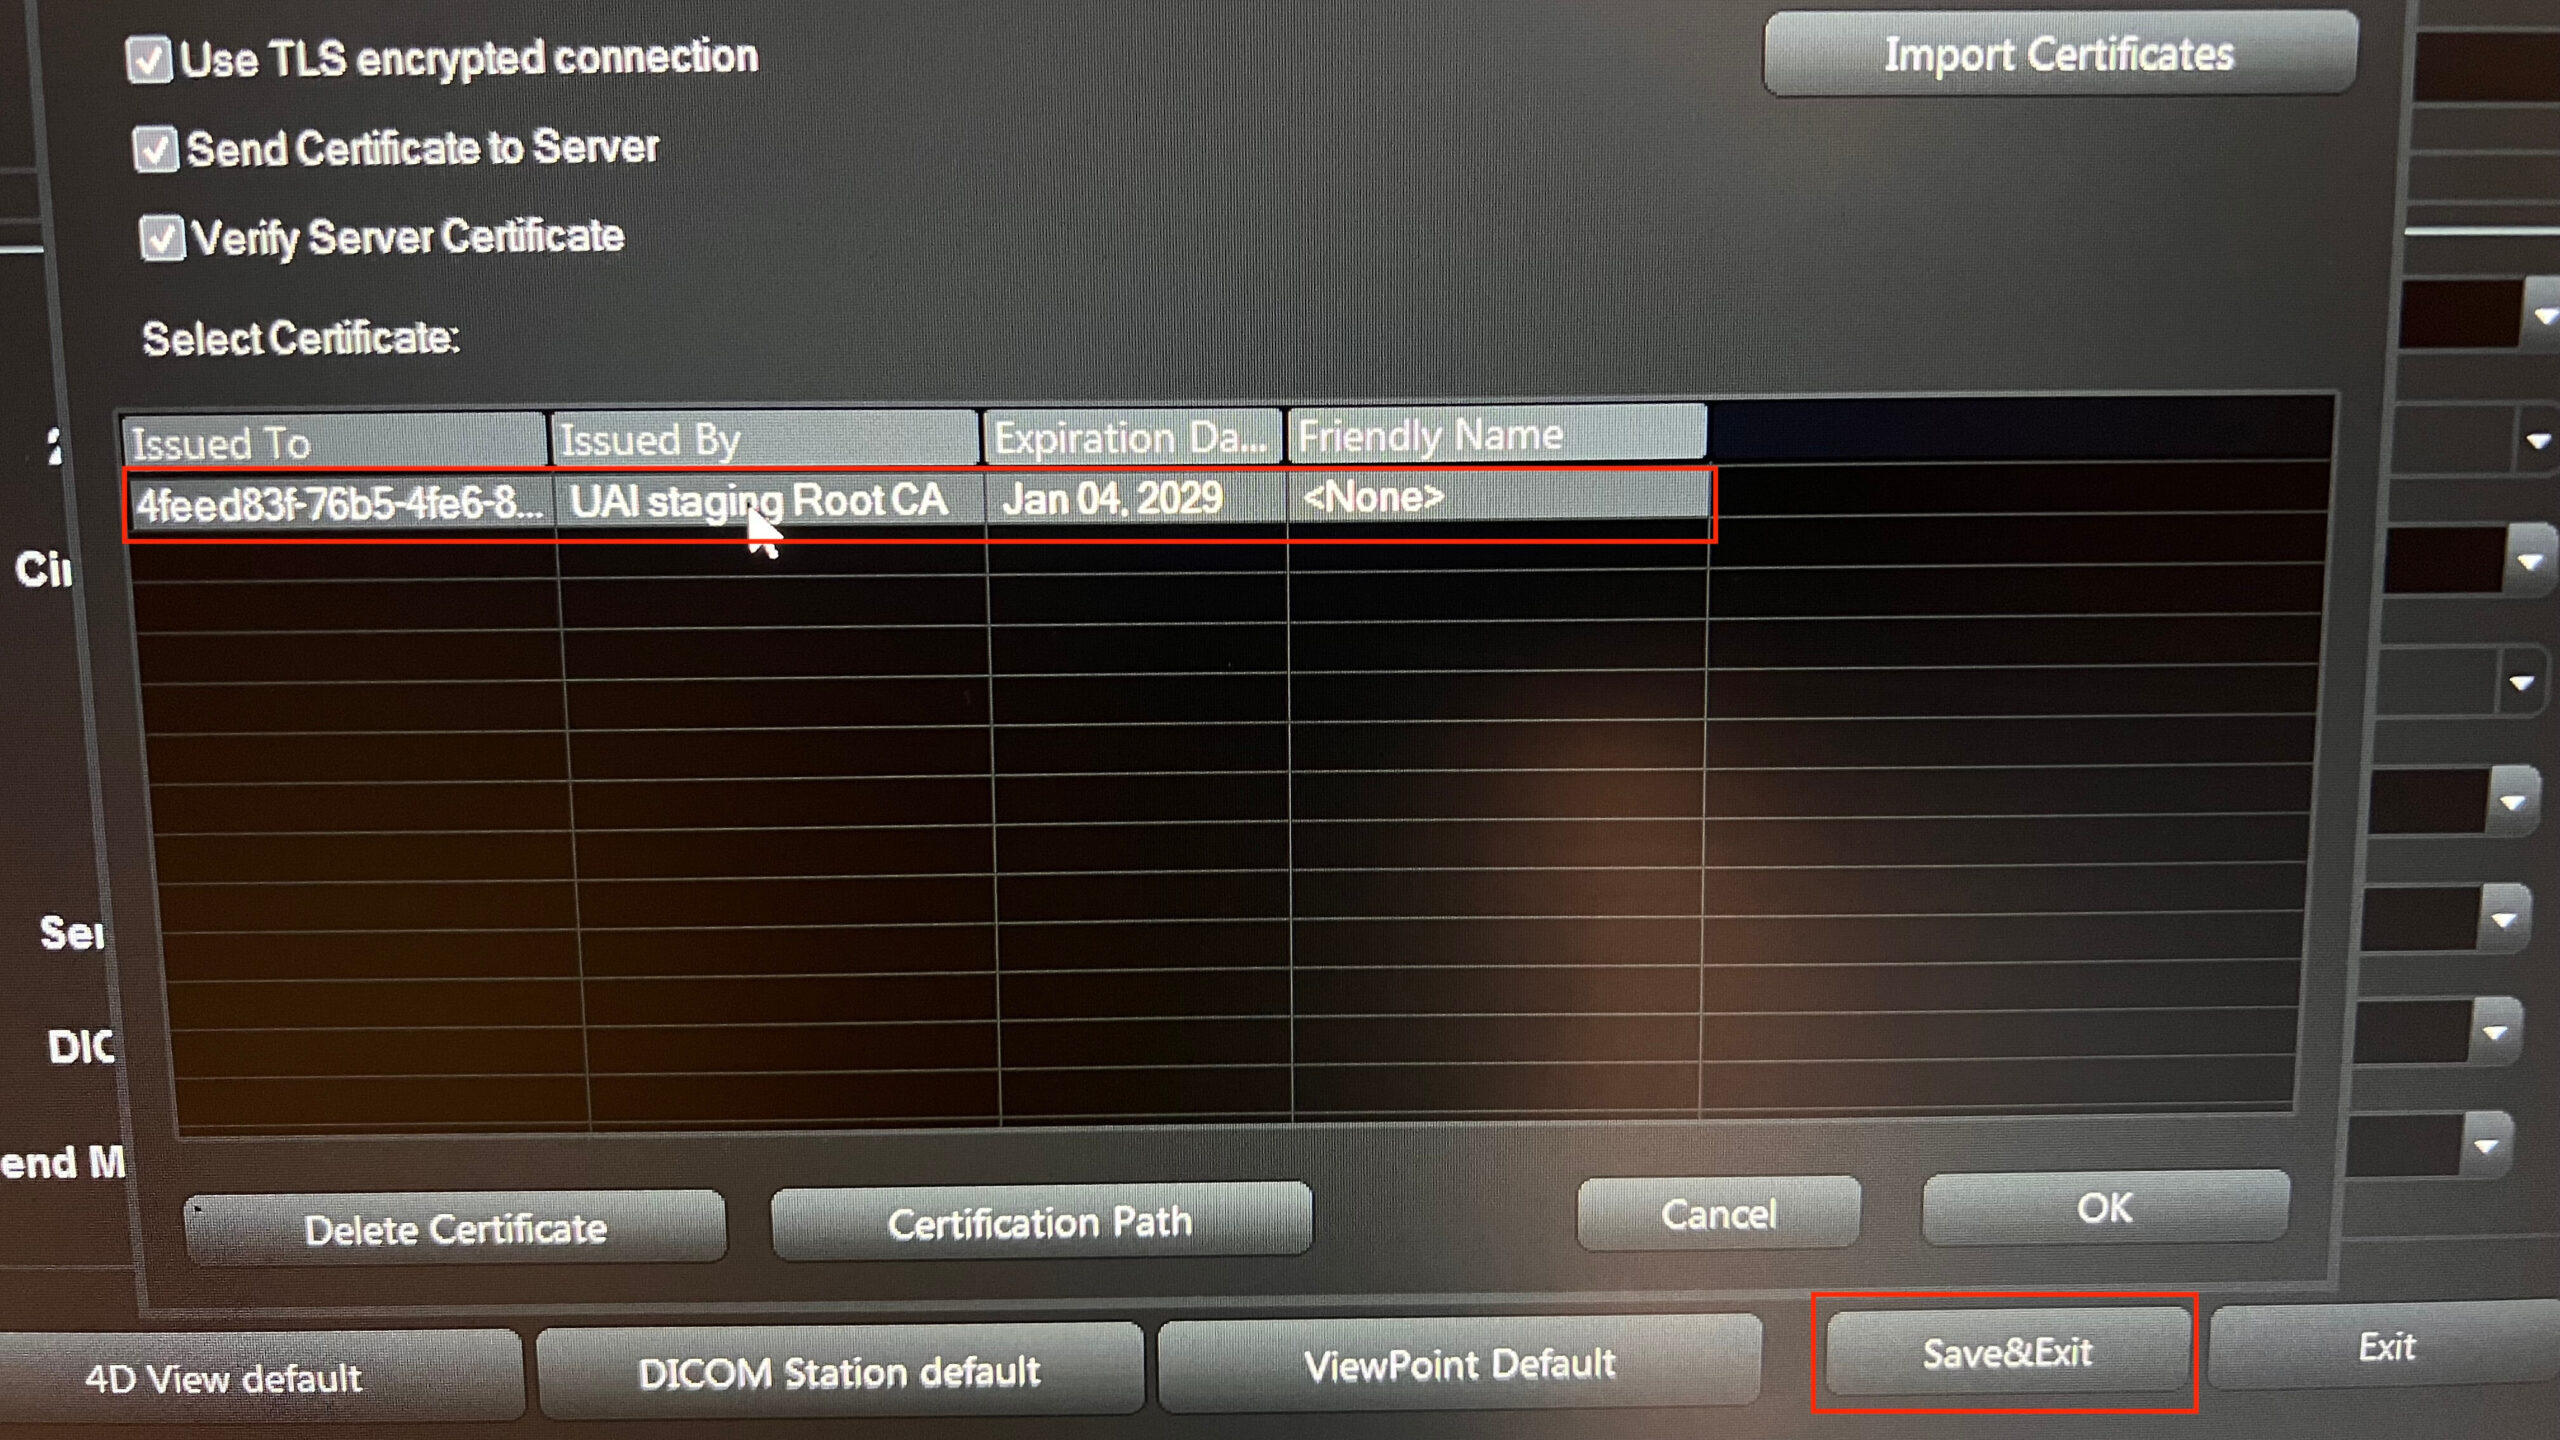
Click TLS to open TLS settings
Enable all TLS settings and click Import Certificates
Select the certificate from the legacy folder
Confirm the certificate appears in the list and click Save & Exit
Verify TLS is enabled
Run Test Connection and confirm Verify: OK Ping failures may be normal
EPIQ and Affiniti
Where to find DICOM settings Network/DICOM → DICOM Settings → DICOM Services
TLS Settings Enable “Use Transport Layer Security (TLS)” and “Use TLS Encryption,” if available. Certificate import may appear as Import Certificates, Manage Certificates, or Security Settings.
Connection Testing After saving, select the DICOM destination and choose Verify. A successful verification indicates the setup is complete. A yellow warning icon during verification is acceptable and does not indicate a problem; a red X indicates the connection failed.
We are continuing to add manufacturer-specific guidance as we expand support. In the meantime, use the general information below to assist with setup. If you need help, you can contact us through Technical Support.
Where to find DICOM settings Look for DICOM settings under Setup, Connectivity, Network, Communications, Export, or System Settings. Common menu paths include Connectivity → DICOM, Network/DICOM, or DICOM Services.
TLS Settings Look for TLS options under Security, Certificates, Encryption, or Transport Layer Security. If you do not see any TLS or certificate options, refer to Troubleshooting or contact us for assistance. Connection Testing Use the device’s Test, Verify, or Echo function to confirm the destination is working. A successful verification indicates the setup is complete. Partial verification or ping failures are common and do not indicate an issue.
Send a Test Study
Once setup is complete, select this destination when you send studies. The machine will securely upload images to Ultrasound AI. Refresh the browser page where the portal is open. The Studies and Patients pages will show the uploaded studies.
Use the section below to resolve common setup and connectivity issues. If the issue persists or isn't listed, contact us through Technical Support.
Check the following:
AE Title matches exactly:
The calling AE Title (the title associated with your machine) must be entered exactly.
AE Titles are case-sensitive and must not include extra spaces.
Verify the hostname or IP address:
Use the hostname or IP address provided on the portal and included in the README.txt.
Older or saved IP addresses may no longer be valid.
Confirm the port number:
Ultrasound AI supports TLS connections only. Use port number 2762.
Common incorrect ports include 104, 4242 and 11112.
Some systems may show warnings or partial verification results that are acceptable.
Review the device-specific guidance to confirm what is considered a successful result for your system.
A red error indicator typically means the connection failed and should be corrected.
TLS must be enabled for the DICOM destination in order to connect successfully.
Depending on the device, this may be labeled as Secure DICOM, TLS, or Transport Layer Security.
If multiple TLS-related options are available, ensure all are enabled, including certificate verification. If no TLS or security options are visible, contact us for assistance.
Most certificate-related issues are caused by importing the wrong files, mixing files from different certificate packages, or using an expired certificate. When multiple certificate packages are downloaded from the portal, confirm that the folder being used matches the AE Title configured on the device.
Only use files from a single certificate package and accept any trust or security warnings when the certificate package is downloaded from the portal. If the system reports that the server is not trusted, reimport the certificates and retry verification.
Certificates expire periodically, and expired certificates must be replaced by generating and importing a new package from the portal.
Old or unused DICOM destinations can cause conflicts during verification. Remove any legacy or unused destinations, save the changes, and retry verification using only the active destination.
Old or unused DICOM destinations can cause conflicts during verification. Remove any legacy or unused destinations, save the changes, and retry verification using only the active destination.
Need help from our team?
To help us resolve your issue faster, please include:
To provide the best experiences, we use technologies like cookies to store and/or access device information. Consenting to these technologies will allow us to process data such as browsing behavior or unique IDs on this site. Not consenting or withdrawing consent, may adversely affect certain features and functions.
Functional
Always active
The technical storage or access is strictly necessary for the legitimate purpose of enabling the use of a specific service explicitly requested by the subscriber or user, or for the sole purpose of carrying out the transmission of a communication over an electronic communications network.
Preferences
The technical storage or access is necessary for the legitimate purpose of storing preferences that are not requested by the subscriber or user.
Statistics
The technical storage or access that is used exclusively for statistical purposes.The technical storage or access that is used exclusively for anonymous statistical purposes. Without a subpoena, voluntary compliance on the part of your Internet Service Provider, or additional records from a third party, information stored or retrieved for this purpose alone cannot usually be used to identify you.
Marketing
The technical storage or access is required to create user profiles to send advertising, or to track the user on a website or across several websites for similar marketing purposes.